Theory or flying - it can be tough, exhausting, challenging and even nerve tickling. Having earned my private pilot license and being an ATPL student myself, I'll share my tips & tricks I gathered from experience and sometimes challenging encounters I witnessed in the cockpit and on the ground.
Furthermore, I'll give you some hints on what to pay especially attention in different scenarios which you won't find in any of your study books. Sharing knowledge and experience might be a good way to make us all better and at the end of the day, even safer pilots.
Please note that all exercises and tables were invented and created by me and were not taken out of question databases as for example Aviationexam.
Disclaimer:
I am not a CFI in any form and all tips and tricks are not to be taken for any reference!
PPL and ATPL theory tips & tricks
General Navigation - Navigation calculations
After you attended to the 3rd or 4th theory class in navigation, you'll figure out that remembering compass courses, bearings, QDMs, QUJs, true and magnetic headings tracks, wind correction angles and so on isn't easy. However, for passing your exam, you'll need to know all of them by heart. Furthermore, it might come in handy later on that you remember them in the cockpit aswell to avoid miscalculations and quickly recap what you've calculated before.
In school, you'll be thrown in a pool full of exercises to calculate each and single one of them. But there is a trick to make things easy. All you need to know are a handful of abbreviations and remember the following table.
Let's see what those abbreviations mean.
True / Variation / Magnetic / Deviation / Compass
This is the order you'll need to keep in mind for all calculations. It is correct for all courses, headings and tracks. One good way to remember them is:
True Virgins Make Dull Companions => TVMDC
East is least - West is best
This means that when getting an Easterly variation or deviation, you'll need to substract it, when getting a Westerly variation or deviation, you'll need to add it.
But attention: This is the rule when calculating from the top to the bottom of the table, meaning in the right order. Going from the top to the bottom (=> TVMDC), you'll need to add, going from the bottom to the top (=> CDMVT), you'll need to substract!
The table
Now it is time for the table. If you manage to remember it, things get easy. You'll see how all of the above is interlinked.
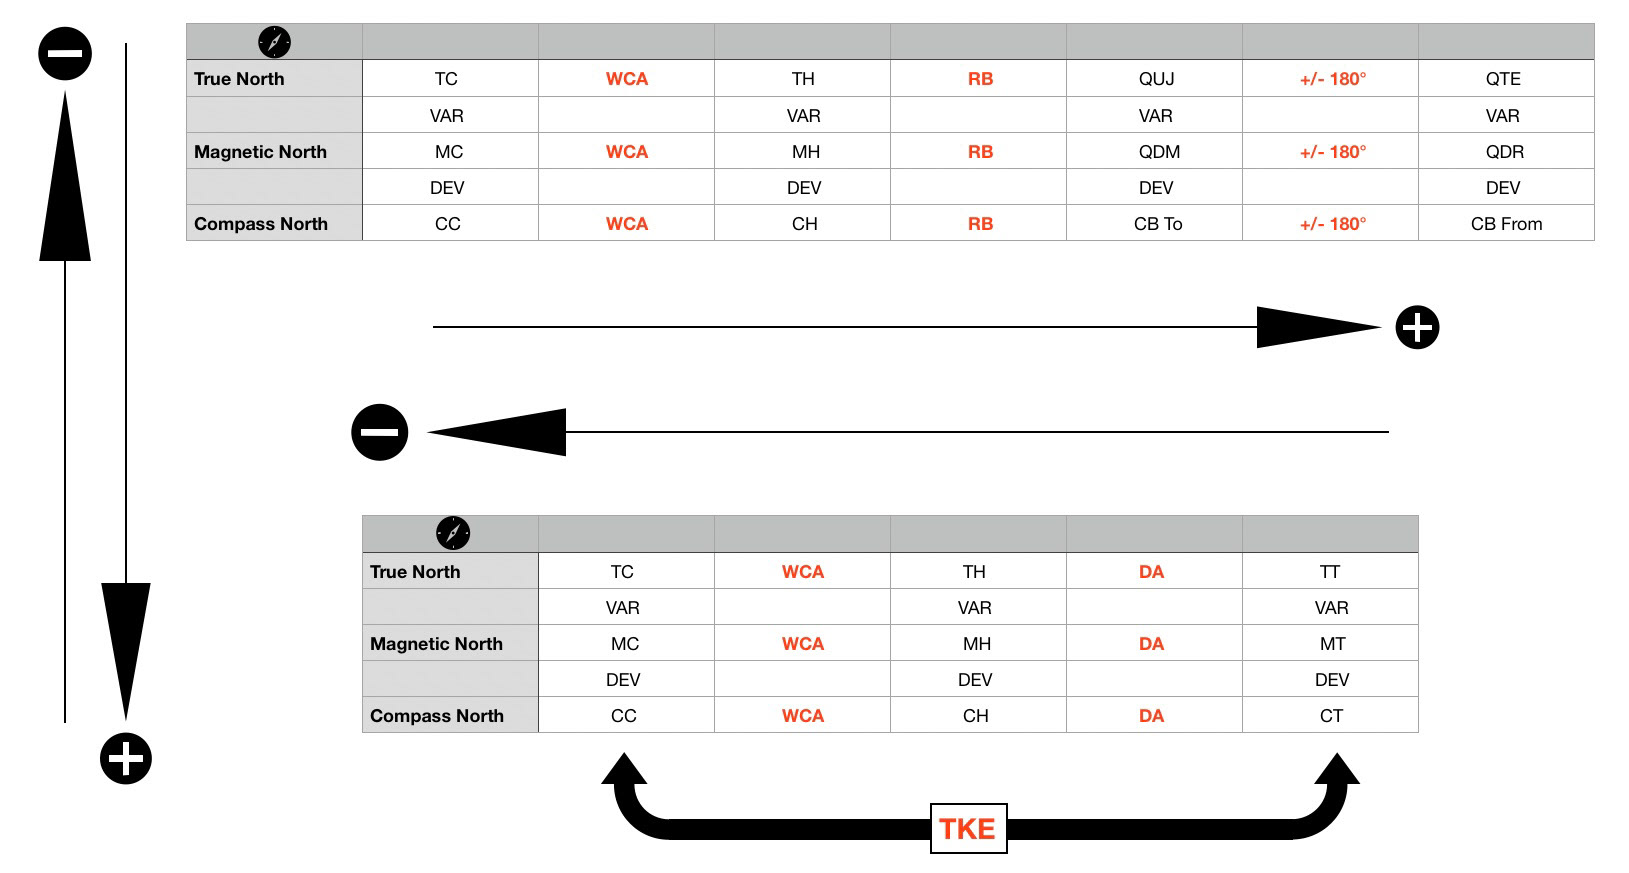
C = Course
H = Heading
T = Track
CB = Compass Bearing
WCA = Wind correction angle
DA = Drift angle
RB = Relative bearing
TKE = Track angle error
Now that you have the table in front of you, let's get to some exercises. The best way to get this done is to quickly draw the table on a sheet of paper at the beginning of your exam, then you'll only have to put in the values and you're done in seconds.
EXERCISE 1:
An aircraft is flying a CH of 220°, variation is 12°E, and the deviation is 2°W. Furthermore, the aircraft flies a WCA of +5°. What is the corresponding TC?
1.: Put in the values that you have. That means the 220° in the CH box.
2.: Find out where the value is you want to find out. In our case we need to go in the first column to the TC, as TC is the value we're looking for. Now substract the WCA as it is positive to get to the CC.
CC = CH - WCA = 220° - 5° = 215°
3.: Simply substract the values of variation and deviation to get up to the TC.
TC = CC - DEV - VAR = 215° - (2°W) = 213° - (12°E) = 225°
EXERCISE 2
Got it? Let's do one more, a little more complicated.
A Cessna 182 enroute to Belgium is flying near DIK VOR on a QDR of 179° with a MH of 340°. The variation in this region is 2°E, the deviation 2°W. What is the QDM of DIK VOR and the QUJ? Furthermore, what is the RB to the VOR?
1: Put in the values that you have. That means the 179° in the QDR box, the 340° in the MH box.
2.: Find out again where the values are that you want to know. Here we need to stay in the 7th colum for the QDR, we have to go to the 5th column for the QUJ and QDM, and we have to go in the 4th table for the RB.
QDM = QDR - 180° = 359°
QUJ = QDM - 2°E = 359° - 2°E = 001°
3.: Find out the RB. The RB, as it can be clearly seen in the table, is the difference btw the MH and the QDM.
RB = QDM - MH = 359° - 340° = 019°
EXERCISE 3:
Just to be sure, let's do the last one. Let's make sure it is a bit of a tricky one!
Luxair 3760 from Lisbon to Luxembourg is enroute to Nantes VOR/DME at FL310 on a QDR of 213°. The crew encounters a northern wind from approximately 355° at 15 knots. The aircraft is on a CH of 025°. The planned TC should be 033°, however, the navigation display shows the crew a TT of 037°. What is the track angle error and the drift angle in that case, aswell as the RB, if the WCA is -5°? Variation is 1°E, deviation is 2°E.
1.: Lets put in the given stuff in our table. That means the 213° in the QDR box, the 025° in the CH box, the 033° in the TC box, the 037° in the TT box.
2.: Now calculate the value you want to know. TKE and DA is asked. Let's do it step by step.
To find the TKE:
TKE = TT - TC = 037° - 033° = 004°
Now lets find the DA. We first have to know the TH therefore.
TH = CH - DEV - VAR = 025° - (2°E) - (1°E) = 028°
Now the DA can be derived.
DA = TT - TH = 037° - 028° = 009°
As we know the QDR, we can calculate the QDM to the station.
QDM = 213° - 180° = 033°
Eventually, the RB to the station is asked. We now calculate the MH. Then, as we have a QDM we may find out the RB:
MH = TH + (1°E) = 028° + (1°E) = 027°
RB = QDM - MH = 033° - 027° = 006°
Radio navigation - Holding entries
Teardrop, parallel or direct entry... What is it? There are many videos around showing how to calculate the entries, depending on the direction you're coming from etc. I'll explain you the easiest way for me to quickly know which entry has to be flown without the use of a drawn, or even printed out compass rose.
Two things that you always know are the inbound and outbound course of the holding and the actual course you're flying. Next to that all you need to remember is "-70°" and "+110°". You'll see how it works.
EXERCISE
Let's keep it easy and define the inbound course of DIK Holding to 270°, the outbound to 090°.
The heading you are flying is 360°.
The rule is simple: Take the reciprocal of your heading, in our case:
360°-180° = 180°
Teardrop entry: Inbound course minus 070°
(In our case: 270° - 70° = 200° => So 200° - 270°)
Parallel entry: Inbound course plus 110°
(In our case: 270° + 110° = 020° => 270° - 020°)
Direct entry: All the rest
(In our case: 020° up to 200°)
Our reciprocal of our heading is 180°, (lies in the field of 020° to 200°), so we fly a direct entry.
Easy as that!
Meteorology - Altimetry calculations
Density altitude
Altough you surely know that density altitude increases with low atmospheric pressure, high temperatures and high humidity, you still want to be sure about the performance of your airplane, so you need to figure out the correct density altitude value. There are many ways to calculate it with tables etc. but here is what I use to keep it simple:
- Density ALT changes by 120ft for every 1°C ISA deviation
- Density ALT changes by 6ft for every 1% of increase in relative humidity
Per definition, density altitude is the pressure altitude corrected for non standard temperatures. This tells us that in the density altitude, pressure and temperature are taken into consideration. Furthermore, relative humidity also plays a role, but tends to be neglected for DA calculations, as the outcoming value is not a key factor, however, if you take it within your calculation, gives you a good further safety margin. How you calculate pressure altitude, is described in the altimetry section.
So eventually, to calculate the correct density altitude, we have to consider temperature, pressure (PA) and humidity in our equation, which is:
DA = PA + [120 x (OAT - ISA)]
Let's solve an exercise to see how that works.
Exercise
Calculate the density altitude for the following airport:
RH: 65%
FE: 1234ft
ISA at FE: 13°C
OAT: 6°C
QNH: 1024hPa
Calculating the pressure altitude PA:
1024hPa - 1013hPa = 11hPa
11hPa x 27ft/hPa = 297ft
1234ft - 297ft = 937ft
The PA is 937ft
Calculating density altitude without RH (DA1):
DA1 = PA + [120 x (OAT - ISA)]
DA1 = 937ft + [120 x (6°C - 13°C)]
DA1 = 937ft + (-840)
DA1 = 97ft
Calculating density altitude with RH (DA2):
DA2 = DA1 + (RH x 6ft/1%)
DA2 = 97ft + 390ft
DA2 = 487ft
The correct density altitude is 487ft.
Practical flying tips & tricks
Flight preparations
Preparation is key. As long as you're still on the ground, you have plenty of time to calculate all data needed for your upcoming flight. Here are some good reminders and tips for some stuff which easily gets underestimated. Let's start with some useful applications you may download to ease your life before take-off. Most of these apps are free.
Useful applications
Weather & altimetry: AeroWeather Apps (Lakehorn AG)
This app package is not for free, however, doesn't cost the world and is very useful. Get TAF's, METAR's and actual WX at your airport with all information you need. The package includes 3 apps: AeroWeather Pro, AeroAltitude, AeroVariation.
Wind: Windy.com (Windyty, SE)
A nice free app to look up actual, or forecasted surface winds in a moving map.
Flight-time records: S & M Lite (Quackstro)
If you're tired of calculating hours together at the end of the flight, this app is something for you. The lite version is good enough to add your flight times together and is for free.
Preflighting the airplane
Wait... is that not what they tell us on day 1 at flight school? Hang on a minute. I felt myself confident about preflighting my aircraft right after having the first hours under my belt, but there are a couple of things I noticed over time and haven't had spent a single thought on before. It may sound stupid or silly, but there's a good reason I put them in here.
Fuel on board
Pay attention on the fuel finger you are using. Especially with club aircraft, it may happen that the wrong fuel stick somehow ended up in the wrong airplane's bag. Verify that the fuel stick exactly matches the aircraft type you're flying. This means that a fuel finger for a Cessna 172N will also only show the correct fuel level of a Cessna 172N. If you take the fuel stick for a Cessna 172R and try to go measure the fuel of your Cessna 172S, your reading might be dramatically different to what it actually is.
Also compare your reading with the fuel specified in the POH. If the manufacturer says, that your airplane holds 25 gallons in one wing, but your fuel stick shows you already 24 gallons, even though the fuel level is somewhat near half full - something's fishy.
Oil level check
Checking the oil level during pre-flight is essential. However, it may get a little tricky - especially, when the aircraft is freshly released from maintenance and an oil change had been performed. New oil, which has circulated through the engine only during the run-up after maintenance, is almost invisible, as it is still fresh, clean and does not contain any particles from the engine. The oil only becomes "visible" when it gets its typical colour, which comes from internal particles being taken away by the oil, but mostly due to the so called blow-by gases mixing with the oil.
Be careful if the oil is barely visible. The casing in which the dip stick is slided into, may accumulate small amounts of oil on its inner walls, which may stick to your dip stick upon sliding it into, or out of the engine. These single drops of oil may, mistakenly, be confused with the actual oil level of the engine. Furthermore, it could be that the oil level itself is not even reaching the dip stick due to whatever reason - but you've just seen some clear and fresh oil on your dip stick when you checked it? Time to get a better look on it! Wipe the dip stick off completely, take a flashlight or go outside the hangar or do whatever needed to be 100% sure that the oil stickin' on that stick is the actual oil level of the engine. You'll need that oil, trust me.
Box the controls
That doesn't mean you should go out and punch a hole into your aileron!
Some people check their controls during preflight by turning the yoke left and right, then pulling back and pushing forward. However, it could be that your controls may block with a crossing steering input, such as aileron and elevator together. To avoid this, turn the yoke to one side, then pull it back, turn it to the other side while holding it back, forward it and then go back to neutral. In that way, you make sure that your controls are effectively "free and correct"!
Static RPM
Especially when you're flying on a hot, humid summer day, with maybe even a low pressure weather situation prevailing, you want your engine to perfom as it should. I bet you felt the difference in performance compared to a take-off on a -10°C cold winter day! But instead of hoping that the engine produces the thrust it should, you can actually check it. In almost every POH, the manufacturer states a so called static RPM at specific conditions. Let's have a look at the following extract of the POH of a Cessna C172N:
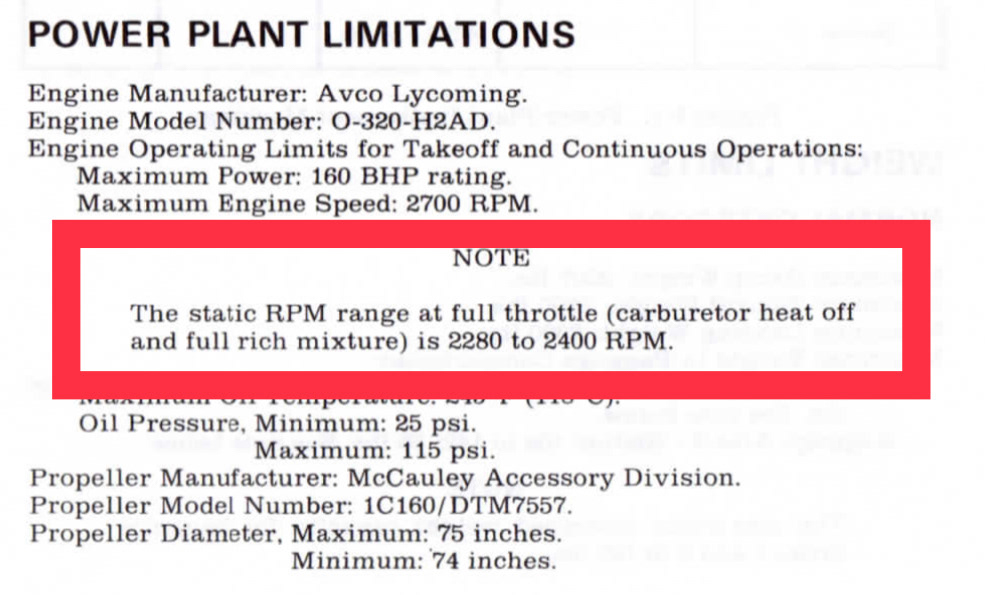
The manufacturer states that with carburetor heat off and fully rich mixture, the engine has to run at minimum 2280 - 2400RPM while you're at full power with the aircraft standing still on the ground.
One good thing to remember this at every take-off, is to make the "Power is set" callout after checking that the engine actually runs on its nominal static RPM!
From take-off to landing
Now some tips for the best part - the actual flight. Let's start at the beginning - the take-off.
Abort the take-off
Talking about density altitude, a heavy airplane, fully loaded and topped off. In addition, the airport has a very short runway and you need to get out of there. A good start is to do the math - using the POH & charts to figure out if you actually make it by the end of the runway at least on paper is one thing, but let's say your airplane if not performing as it should - for whatever reason. Well, there is a rule of thumb for that too, saying:
- If 70% of the take-off speed have not been reached at 50% of the runway length, ABORT the take-off!
In order to determine these factors in advance, pick the airport charts or even simple devices like google maps or whatsoever, to figure out where the approximate middle of the runway is. Take something easy to spot during take-off like intersections, taxiways, buldings, service-roads etc in order to give yourself a good visual reference. Furthermore, figure out what 70% of your take-off speed is. Let's say at a rotation speed of 60 knots, the 70% mark is at 42 knots. Give yourself a little safety margin by rounding the speed up to 45 knots and you'll feel much better.
Remember that basically no performance factor can be influenced by the pilot, except for the aircraft's weight. However, if you don't wanna leave your luggage there, or don't want to kick out any of your passengers, you can think ahead and plan to take-off early in the morning, as mostly lower temperatures prevail at this time of the day and thus, giving you more performance and safety margins due to a lower density altitude.
Kick the ball
It is crucial to keep your airplane coordinated - no matter what. A flat- or deep spin or a spiral dive in the so called "Danger zone", the zone just above the ground you're flying in, where no stall or any other unusual situation can be recovered from is deadly. Some say, they won't fly that low to get even close that zone. Well, we all have to fly there, for example during take-off or landing.
On take-off, basically everything wants to tear your airplane to the left. The torque of the engine, the propeller wash around the fuselage, aswell as the "P-factor" while climbing, or even the gyroscopic precession force in case you're flying a taildragger aircraft. That one sentence you hear CFIs say all the time; "More right rudder" has a good reason. It is not only to keep your airplane on track during the take-off roll or after departure, it is also necessary to keep the airplane coordinated.
Imagine you're departing or doing a go-around. You'll find yourself in a very demanding situation, while you're flying at low speed (even close to stall speed) at a high angle of attack at low altitude. Now, imagine your airplane is not in coordinated flight and you have to make a right turn. Those are the ingredients for a very dynamic and hazardous situation with no safety margins left. As you know stall speed increases with bank angle. A bigger gust under the wings may be enough for the wings to stall on one side, which could lead to a deadly spin.
The same counts for the famous base-to-final turn. There were hundreds of pilots dying in GA aircraft in that seemingly easy turn, due to not keeping their aircraft coordinated while flying so close to stall speed at high angles of attack.
Try to keep that ball centered in any attitude you're flying in. During take-off, mid-air manouvering or landing, it is substantial to always fly coordinated to avoid one of the major killers in GA aircraft accidents.
Descend rate calculations made easy
Want to know when to descend, time or distance wise and at which rate? It's simple!
Rate of descend (ROD)
Rate of descend = 0.5 x Ground speed
Example:
Rate of descend while flying a GS of 120kts.
ROD = 0,5 x 120
ROD = 600 ft/min
The rate of descend will be 600ft/min.
=> The actual result should be multiplied by 10, but as it is self explaining and to keep it simple, just keep in mind "0,5 X GS".
The top of descend (TOD)
The optimum glidepath for most aircraft is around 3°. This glidepath equals to 318ft/NM. Most GA piston airplanes descend at a GS of around 120kts, so, as we learned before, something like 600ft/min. This is the same as 318ft / NM in terms of distance (120kts = 2NM/min). Sounds difficult? Wait!
To know how many miles from your destination you have to start your descend, just do the following:
TOD = Altitude to descend : 300
To know when to descend is just as easy:
TOD = Altitude to descend : ROD
Example:
An aircraft flying at 8000ft needs to descend to the pattern altitude of 2000ft. ROD = 600ft/min. When and at how many miles from the pattern does the a/c have to start its descend?
TOD = (8000ft - 2000ft) : 300
TOD = 6000ft : 300
TOD = 20NM
TOD = 6000ft : 600ft/min
TOD = 10min
The aircraft needs to start its descend 20NM or 10 minutes from the airport pattern.
Manouvering speed - Understanding why it changes opposite with weight
It may sound weird if you sit in flight school and hear that the havier your airplane is, the higher is the manouvering speed. Well, the reason is simple. The definition of the manouvering speed says:
The manouvering speed is the speed at which the aircraft stalls before its structual limiting factors are reached, when any of the flight controls are fully deflected.